FAQ & How to Use
Everything you need to know about Linux Game Bench
📦 Installation
1. Install Dependencies
First, install MangoHud, Vulkan tools, git and pipx for your distribution:
Arch Linux / Manjaro / CachyOS:
sudo pacman -S mangohud lib32-mangohud vulkan-tools git python-pipxUbuntu / Debian / Pop!_OS:
sudo apt install mangohud vulkan-tools git pipxFedora:
sudo dnf install mangohud vulkan-tools git pipxopenSUSE:
sudo zypper install mangohud vulkan-tools python313-pipx2. Install Linux Game Bench
pipx install git+https://github.com/taaderbe/linuxgamebench.git3. Verify Installation
lgb --version4. Check System Requirements
lgb checkThis checks if all requirements are met: MangoHud installed, Steam running, games found, etc. Fix any issues before recording.
5. Optional: Install the GUI
Linux Game Bench also offers an optional graphical interface built with PySide6 (Qt6). If you already installed the CLI, add the GUI like this:
Arch Linux / Manjaro / CachyOS:
pipx inject linux-game-benchmark PySide6Ubuntu / Debian / Pop!_OS:
pipx inject linux-game-benchmark PySide6Fedora:
pipx inject linux-game-benchmark PySide6openSUSE:
pipx inject linux-game-benchmark PySide6Or install CLI + GUI together (fresh install):
pipx install "linux-game-benchmark[gui]" git+https://github.com/taaderbe/linuxgamebench.gitLaunch the GUI:
lgb-guiThe GUI provides the same features as the CLI: scan games, run benchmarks, view results, and upload to the community database.
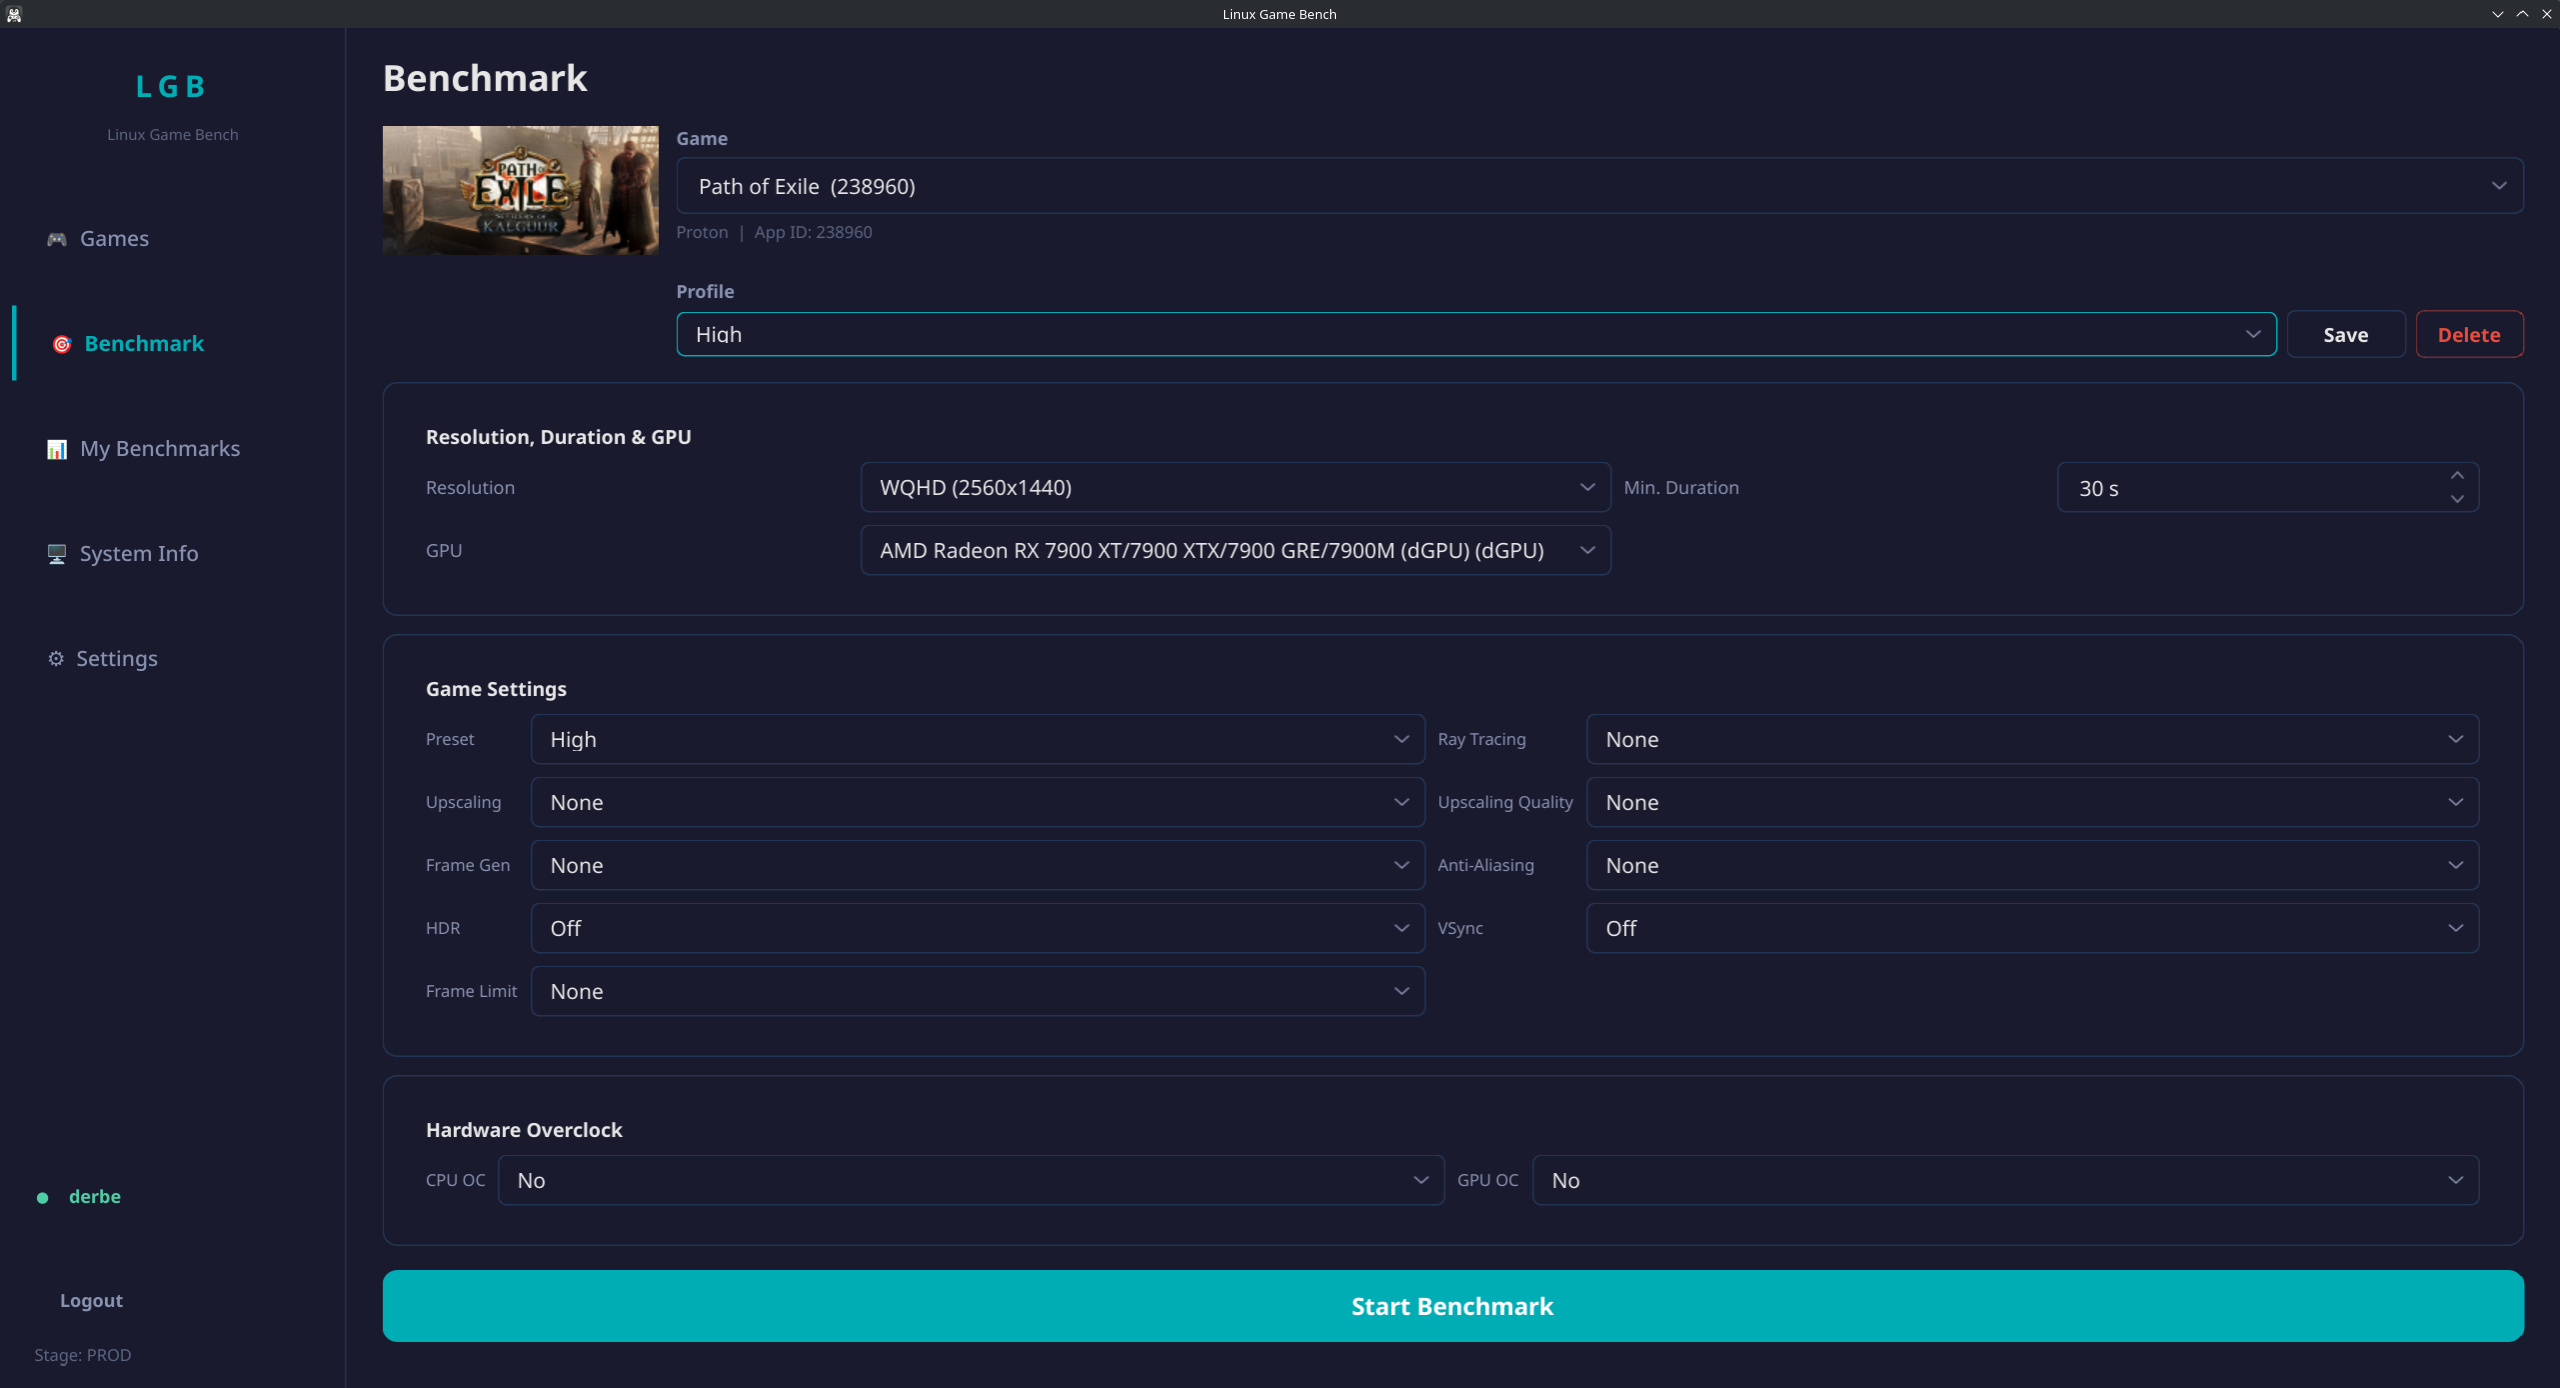
Linux Game Bench GUI - Benchmark View
🎮 Recording a Benchmark
Step 1: List Your Games
lgb list-gamesThis shows all Steam games installed on your system:
                 Installed Games
┏━━━━━━━━━┳━━━━━━━━━━━━━━━━━━━━━━━━━━━━━┳━━━━━━━━┓
┃  App ID ┃ Name                        ┃ Type   ┃
┡━━━━━━━━━╇━━━━━━━━━━━━━━━━━━━━━━━━━━━━━╇━━━━━━━━┩
│  397540 │ Borderlands 3               │ Proton │
│ 1091500 │ Cyberpunk 2077              │ Proton │
│ 1245620 │ Elden Ring                  │ Proton │
│  427520 │ Factorio                    │ Native │
│  526870 │ Satisfactory                │ Proton │
└─────────┴─────────────────────────────┴────────┘
Total: 5 games
Step 2: Start Recording
By game name:
lgb benchmark "Cyberpunk 2077"
lgb benchmark "Counter-Strike 2"
lgb benchmark "Elden Ring"
By Steam App ID:
lgb benchmark 1091500    # Cyberpunk 2077
lgb benchmark 730        # Counter-Strike 2
lgb benchmark 1245620    # Elden Ring
Tip: Run lgb list-games to see all your games with their App IDs.
Complete Examples
Here are full command examples with settings pre-configured:
With auto-stop and resolution (recommended):
lgb benchmark "Cyberpunk 2077" --preset Ultra --resolution FHD -d 60Tip: Always use the same duration (-d) and resolution so you can compare benchmarks better. You don't have to watch the time yourself. Min: 30 seconds, Max: 5 minutes.
Supported resolutions: HD (1280x720), FHD (1920x1080), WQHD (2560x1440), UWQHD (3440x1440), UHD (3840x2160)
Cyberpunk 2077 - Ultra with Ray Tracing and FSR:
lgb benchmark "Cyberpunk 2077" --preset Ultra --resolution FHD --raytracing High --upscaling FSR3 --upscaling-quality Quality --framegen FSR3-FG -d 60Elden Ring - High settings with frame limit:
lgb benchmark 1245620 --preset High --resolution FHD --framelimit 60 -d 60Counter-Strike 2 - Competitive low latency:
lgb benchmark "Counter-Strike 2" --preset Low --resolution FHD -d 60Note: All options not specified default to None/Off. You only need to set what you're actually using.
Keyboard Shortcuts (In-Game)
Shift+F2- Start/Stop recording manuallyShift+F3- Hide/Show the overlay (if it's distracting)
What to Look For
Important: When the game starts, you must see the MangoHud overlay. It shows FPS, GPU, CPU stats and more:
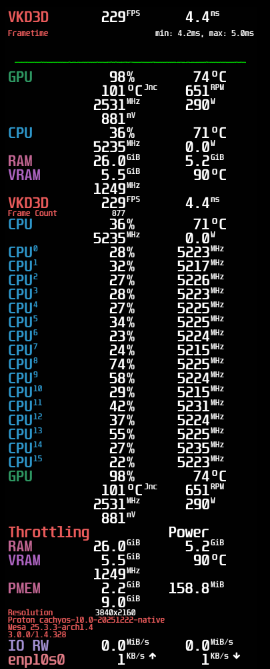
Overlay visible = Ready
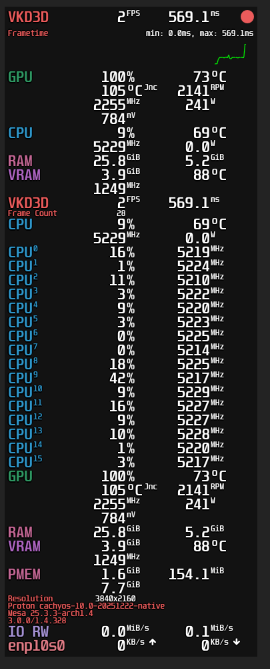
Red dot = Recording active
The red dot in the top right corner of the overlay indicates that recording is active. If you don't see the overlay, MangoHud is not working correctly.
Play until you stop recording with Shift+F2 or the timer ends. Your benchmark is automatically saved.
☁️ Uploading Your Benchmark
After a valid benchmark, you'll always be asked:
Upload to community database? [Y/n]If you choose to upload, you'll be asked if you want to log in. You always have the choice:
Without Account
Your benchmark is uploaded anonymously. It's publicly visible but you cannot edit or delete it later.
With Account (Recommended)
Log in before or during upload to manage your benchmarks:
lgb loginBenefits:
- Manage all your benchmarks in "My Benchmarks"
- Edit game settings after upload (preset, ray tracing, etc.)
- Add personal notes to your benchmarks
- Delete benchmarks anytime
- Compare your benchmarks side-by-side
Register at linuxgamebench.com/register
❓ Frequently Asked Questions
What is MangoHud?
Does it work with Proton/Wine games?
How long should I record?
My GPU is detected wrong (shows iGPU instead of dGPU)
Can I delete my benchmarks?
Is my data private?
What does --framelimit do?
The --framelimit option (e.g., --framelimit 144) is a metadata tag only - it does NOT automatically limit your FPS!
You must set the frame limit yourself in:
- The game's graphics settings, OR
- Your GPU driver (NVIDIA Control Panel / AMD Adrenalin), OR
- MangoHud config (
fps_limit=144)
Use cases:
- Document that you're testing with a specific FPS cap
- Compare benchmarks at same frame limit (e.g., 60 FPS lock vs unlimited)
- Test with VSync enabled (
--vsync on --framelimit 144) to see if your GPU can maintain the target
🔧 Troubleshooting
MangoHud overlay not showing
Make sure MangoHud is installed correctly:
mangohud --versionFor Proton games, you may need to add MANGOHUD=1 %command% to Steam launch options.
"lgb: command not found"
Add pipx to your PATH:
pipx ensurepathThen restart your terminal or run source ~/.bashrc
Game crashes when recording
Try running the game without MangoHud first to ensure it works. Some anti-cheat systems may block overlays.
Driver version shows as "Unknown"
The driver version is detected using different tools depending on your GPU:
AMD / Intel (Mesa driver): Install mesa-utils (provides glxinfo)
sudo pacman -S mesa-utils          # Arch/CachyOS
sudo apt install mesa-utils        # Ubuntu/Debian
sudo dnf install mesa-demos        # Fedora
sudo zypper install Mesa-demo-x    # openSUSE
NVIDIA (proprietary driver): Install nvidia-utils (provides nvidia-smi)
sudo pacman -S nvidia-utils        # Arch/CachyOS
sudo apt install nvidia-utils-xxx  # Ubuntu (replace xxx with version)
sudo dnf install nvidia-driver     # Fedora
The tool also uses vulkaninfo as a fallback, so make sure vulkan-tools is installed.
💻 CLI Commands Reference
All available commands (lgb --help):
Main Commands
lgb login        # Login to Linux Game Bench
lgb logout       # Logout from Linux Game Bench
lgb status       # Show current login status
lgb config       # Configure client settings
lgb settings     # Configure default values for prompts
lgb scan         # Scan Steam library for games
lgb list-games   # List installed Steam games
lgb check        # Check system requirements
lgb info         # Show system information
lgb benchmark    # Run benchmark for a game
lgb analyze      # Analyze existing MangoHud log
lgb report       # Generate report from results
Game Settings Options
Use with lgb benchmark:
--preset          None / Low / Medium / High / Ultra / Custom
--raytracing      None / Low / Medium / High / Ultra / Pathtracing
--upscaling       None / FSR1 / FSR2 / FSR3 / FSR4 / DLSS / DLSS2 /
                  DLSS3 / DLSS3.5 / DLSS4 / XeSS / XeSS2 / TSR
--upscaling-quality   None / Performance / Balanced / Quality / Ultra-Quality
--framegen        None / FSR3-FG / DLSS3-FG / DLSS4-FG / DLSS4-MFG /
                  XeSS-FG / AFMF / AFMF2 / AFMF3 / Smooth-Motion
--aa              None / FXAA / SMAA / TAA / DLAA / MSAA
--hdr             On / Off
--vsync           On / Off
--framelimit      None / 30 / 60 / 120 / 144 / 165 / 240 / 360
--cpu-oc          Yes / No
--gpu-oc          Yes / No
Tip: Use lgb settings to save default values so you don't have to specify them every time.
📦 Installation
1. Abhängigkeiten installieren
Zuerst MangoHud, Vulkan-Tools, git und pipx für deine Distribution installieren:
Arch Linux / Manjaro / CachyOS:
sudo pacman -S mangohud lib32-mangohud vulkan-tools git python-pipxUbuntu / Debian / Pop!_OS:
sudo apt install mangohud vulkan-tools git pipxFedora:
sudo dnf install mangohud vulkan-tools git pipxopenSUSE:
sudo zypper install mangohud vulkan-tools python313-pipx2. Linux Game Bench installieren
pipx install git+https://github.com/taaderbe/linuxgamebench.git3. Installation prüfen
lgb --version4. Systemanforderungen prüfen
lgb checkPrüft ob alle Voraussetzungen erfüllt sind: MangoHud installiert, Steam läuft, Spiele gefunden, etc. Behebe Probleme vor der Aufnahme.
5. Optional: GUI installieren
Linux Game Bench bietet auch eine optionale grafische Oberfläche mit PySide6 (Qt6). Wenn du die CLI bereits installiert hast, füge die GUI so hinzu:
Arch Linux / Manjaro / CachyOS:
pipx inject linux-game-benchmark PySide6Ubuntu / Debian / Pop!_OS:
pipx inject linux-game-benchmark PySide6Fedora:
pipx inject linux-game-benchmark PySide6openSUSE:
pipx inject linux-game-benchmark PySide6Oder CLI + GUI zusammen installieren (Neuinstallation):
pipx install "linux-game-benchmark[gui]" git+https://github.com/taaderbe/linuxgamebench.gitGUI starten:
lgb-guiDie GUI bietet die gleichen Funktionen wie die CLI: Spiele scannen, Benchmarks ausführen, Ergebnisse ansehen und zur Community-Datenbank hochladen.
Linux Game Bench GUI - Benchmark-Ansicht
🎮 Benchmark aufnehmen
Schritt 1: Spiele auflisten
lgb list-gamesZeigt alle installierten Steam-Spiele an:
                 Installed Games
┏━━━━━━━━━┳━━━━━━━━━━━━━━━━━━━━━━━━━━━━━┳━━━━━━━━┓
┃  App ID ┃ Name                        ┃ Type   ┃
┡━━━━━━━━━╇━━━━━━━━━━━━━━━━━━━━━━━━━━━━━╇━━━━━━━━┩
│  397540 │ Borderlands 3               │ Proton │
│ 1091500 │ Cyberpunk 2077              │ Proton │
│ 1245620 │ Elden Ring                  │ Proton │
│  427520 │ Factorio                    │ Native │
│  526870 │ Satisfactory                │ Proton │
└─────────┴─────────────────────────────┴────────┘
Total: 5 games
Schritt 2: Aufnahme starten
Nach Spielname:
lgb benchmark "Cyberpunk 2077"
lgb benchmark "Counter-Strike 2"
lgb benchmark "Elden Ring"
Nach Steam App ID:
lgb benchmark 1091500    # Cyberpunk 2077
lgb benchmark 730        # Counter-Strike 2
lgb benchmark 1245620    # Elden Ring
Tipp: Mit lgb list-games siehst du alle deine Spiele mit ihren App IDs.
Komplette Beispiele
Hier sind vollständige Befehlsbeispiele mit voreingestellten Settings:
Mit Auto-Stopp und Auflösung (empfohlen):
lgb benchmark "Cyberpunk 2077" --preset Ultra --resolution FHD -d 60Tipp: Nimm immer die gleiche Dauer (-d) und Auflösung, dann kannst du Benchmarks besser vergleichen. Du musst nicht selbst auf die Zeit achten. Min: 30 Sekunden, Max: 5 Minuten.
Unterstützte Auflösungen: HD (1280x720), FHD (1920x1080), WQHD (2560x1440), UWQHD (3440x1440), UHD (3840x2160)
Cyberpunk 2077 - Ultra mit Ray Tracing und FSR:
lgb benchmark "Cyberpunk 2077" --preset Ultra --resolution FHD --raytracing High --upscaling FSR3 --upscaling-quality Quality --framegen FSR3-FG -d 60Elden Ring - High-Einstellungen mit Frame-Limit:
lgb benchmark 1245620 --preset High --resolution FHD --framelimit 60 -d 60Counter-Strike 2 - Kompetitiv, niedrige Latenz:
lgb benchmark "Counter-Strike 2" --preset Low --resolution FHD -d 60Hinweis: Alle nicht angegebenen Optionen sind automatisch None/Off. Du musst nur setzen, was du tatsächlich verwendest.
Tastenkürzel (Im Spiel)
Shift+F2- Aufnahme manuell starten/stoppenShift+F3- Overlay ein-/ausblenden (falls es stört)
Worauf du achten musst
Wichtig: Wenn das Spiel startet, muss das MangoHud-Overlay sichtbar sein. Es zeigt FPS, GPU, CPU-Statistiken und mehr:
Overlay sichtbar = Bereit
Roter Punkt = Aufnahme aktiv
Der rote Punkt oben rechts im Overlay zeigt an, dass die Aufnahme läuft. Wenn du das Overlay nicht siehst, funktioniert MangoHud nicht korrekt.
Spiele bis du die Aufnahme mit Shift+F2 stoppst oder der Timer endet. Dein Benchmark wird automatisch gespeichert.
☁️ Benchmark hochladen
Nach einem gültigen Benchmark wirst du immer gefragt:
Upload to community database? [Y/n]Wenn du hochlädst, wirst du gefragt, ob du dich einloggen möchtest. Du hast immer die Wahl:
Ohne Account
Dein Benchmark wird anonym hochgeladen. Er ist öffentlich sichtbar, aber du kannst ihn später nicht bearbeiten oder löschen.
Mit Account (Empfohlen)
Logge dich vor oder während dem Upload ein, um deine Benchmarks zu verwalten:
lgb loginVorteile:
- Alle Benchmarks in "My Benchmarks" verwalten
- Spieleinstellungen nach dem Upload bearbeiten (Preset, Ray Tracing, etc.)
- Persönliche Notizen zu deinen Benchmarks hinzufügen
- Benchmarks jederzeit löschen
- Benchmarks nebeneinander vergleichen
Registriere dich auf linuxgamebench.com/register
❓ Häufige Fragen
Was ist MangoHud?
Funktioniert es mit Proton/Wine-Spielen?
Wie lange sollte ich aufnehmen?
Meine GPU wird falsch erkannt (zeigt iGPU statt dGPU)
Kann ich meine Benchmarks löschen?
Sind meine Daten privat?
Was macht --framelimit?
Die --framelimit Option (z.B. --framelimit 144) ist nur ein Metadaten-Tag - sie limitiert NICHT automatisch deine FPS!
Du musst das Frame-Limit selbst setzen in:
- Den Grafikeinstellungen des Spiels, ODER
- Deinem GPU-Treiber (NVIDIA Control Panel / AMD Adrenalin), ODER
- MangoHud Config (
fps_limit=144)
Anwendungsfälle:
- Dokumentieren, dass du mit einem bestimmten FPS-Limit testest
- Benchmarks bei gleichem Frame-Limit vergleichen (z.B. 60 FPS Lock vs. unbegrenzt)
- Mit VSync testen (
--vsync on --framelimit 144) um zu sehen, ob deine GPU das Ziel halten kann
🔧 Problemlösung
MangoHud-Overlay wird nicht angezeigt
Stelle sicher, dass MangoHud korrekt installiert ist:
mangohud --versionFür Proton-Spiele musst du eventuell MANGOHUD=1 %command% zu den Steam-Startoptionen hinzufügen.
"lgb: command not found"
Füge pipx zu deinem PATH hinzu:
pipx ensurepathDann Terminal neustarten oder source ~/.bashrc ausführen.
Spiel stürzt bei Aufnahme ab
Versuche das Spiel zuerst ohne MangoHud zu starten, um sicherzustellen, dass es funktioniert. Manche Anti-Cheat-Systeme blockieren Overlays.
Treiberversion wird als "Unknown" angezeigt
Die Treiberversion wird mit verschiedenen Tools erkannt, je nach GPU:
AMD / Intel (Mesa-Treiber): Installiere mesa-utils (enthält glxinfo)
sudo pacman -S mesa-utils          # Arch/CachyOS
sudo apt install mesa-utils        # Ubuntu/Debian
sudo dnf install mesa-demos        # Fedora
sudo zypper install Mesa-demo-x    # openSUSE
NVIDIA (proprietärer Treiber): Installiere nvidia-utils (enthält nvidia-smi)
sudo pacman -S nvidia-utils        # Arch/CachyOS
sudo apt install nvidia-utils-xxx  # Ubuntu (xxx durch Version ersetzen)
sudo dnf install nvidia-driver     # Fedora
Das Tool nutzt auch vulkaninfo als Fallback, stelle also sicher dass vulkan-tools installiert ist.
💻 CLI-Befehle Referenz
Alle verfügbaren Befehle (lgb --help):
Hauptbefehle
lgb login        # Bei Linux Game Bench anmelden
lgb logout       # Von Linux Game Bench abmelden
lgb status       # Aktuellen Login-Status anzeigen
lgb config       # Client-Einstellungen konfigurieren
lgb settings     # Standardwerte für Prompts konfigurieren
lgb scan         # Steam-Bibliothek nach Spielen durchsuchen
lgb list-games   # Installierte Steam-Spiele auflisten
lgb check        # Systemanforderungen prüfen
lgb info         # Systeminformationen anzeigen
lgb benchmark    # Benchmark für ein Spiel starten
lgb analyze      # Existierendes MangoHud-Log analysieren
lgb report       # Bericht aus Ergebnissen erstellen
Spieleinstellungs-Optionen
Verwendung mit lgb benchmark:
--preset          None / Low / Medium / High / Ultra / Custom
--raytracing      None / Low / Medium / High / Ultra / Pathtracing
--upscaling       None / FSR1 / FSR2 / FSR3 / FSR4 / DLSS / DLSS2 /
                  DLSS3 / DLSS3.5 / DLSS4 / XeSS / XeSS2 / TSR
--upscaling-quality   None / Performance / Balanced / Quality / Ultra-Quality
--framegen        None / FSR3-FG / DLSS3-FG / DLSS4-FG / DLSS4-MFG /
                  XeSS-FG / AFMF / AFMF2 / AFMF3 / Smooth-Motion
--aa              None / FXAA / SMAA / TAA / DLAA / MSAA
--hdr             On / Off
--vsync           On / Off
--framelimit      None / 30 / 60 / 120 / 144 / 165 / 240 / 360
--cpu-oc          Yes / No
--gpu-oc          Yes / No
Tipp: Mit lgb settings kannst du Standardwerte speichern, damit du sie nicht jedes Mal angeben musst.